
 |
|
|||||||
| Construction Equipment If it digs, pushes, hauls dirt "off road" post it here. |
 |
|
|
Thread Tools | Display Modes |
|
#1
|
|||
|
|||
|
Dear all,
as I'm new to this forum, maybe allow me to introduce myself. I've been building R/C cars for over 20 years now but only started with serious modifications and own designs when the Crawler craze (TLT-based) first hit. I've always had a particular interest in earth-moving machines, particularly graders - from horse-drawn to the most advanced concepts. I wanted to build one in about 2005 - but I wasn't quite there yet and it remained a rather hopeless CAD model  In the meantime, there are now a number of grader models, often based on simple modifications of the Bruder Grader - I wanted something a bit more substantial with as many functions as possible - without going to the top-of-the-line like the 1:8 O&K in Germany or the CATs I've seen here. Wow! No mill or lathe or budget for hydraulics obviously meant I had to cut back on something. As I wanted good operation, I threw scale realism pretty much out of the window. It took a lot of planning, but I dare say that I have achieved my goal of building a relatively affordable grader with basic tools that still performs well. 'll post a few pictures, but if you want to see more, please follow this link to a gallery I have set up, it roughly goes along the build process: http://flickr.com/gp/22070130@N07/13BERN The grader uses the cab and bonnet (which will be extended eventually) of the Bruder toy. The machine itself is considerably larger, though. In 1:14.5 it is just within the 3m width-limit that makes it street legal in the EU without special permit. In 1:Tamiya, it has a few inches to spare and fits with the trucks quite nicely, I think. 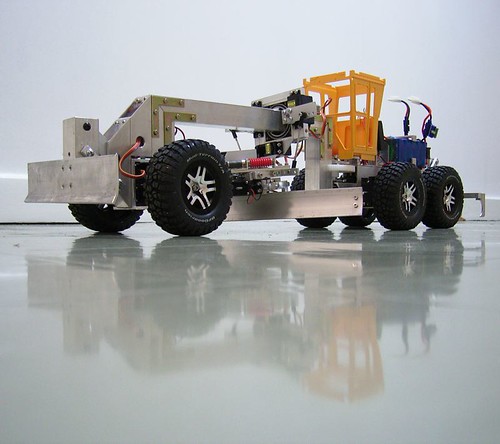 http://www.flickr.com/photos/2207013...57626598857828 The construction is based around aluminium profiles (as is obvious). As power tools, only a drill press, a mitre saw and a jigsaw were used. Everything is bolted together, mainly with stainless M3 cylinder head screws. The main frame is held by stainless M3 bolts with hexagonal heads in the hope that this gives a little bit of realism. The design is pretty basic - lots of right angles and M3 is of course not scale - but there's no way I will tap all these threads in M2  Drive is through four RB35 motors. Wheels and tires are from the Traxxas Slash 4x4 and offer a small rim diameter on the outside, but a large one on the inside, allowing more room. Initially I had planned 6x6, but couldn't do driven front wheels with wheel-lean and so went for non-driven front wheels with wheel lean. I plan to cover the rims eventually as it looks too much like a sports car, but I am not quite sure how to do that - yet. All functions are operated by electric motors, either in servos or as gear motors. I opted for the cheap MG995 servos. Their performance issues are not so much an problem for a slow machine as they are for airplanes. But the looseness in the gears is problematic. The 996R is much better, I hear. Might upgrade eventually. I converted one servo to a spindle drive (to tilt the moldboard) and used a gear motor with a pinion-pinion transmission to move the moldboard sideways: The driven pinion has an M4 thread tapped into it and drives the brass M4 threaded rod. Works nicely and seems robust enough to cope with dirt - but this is clearly not ideal, so I will have to think about some kind of shielding. 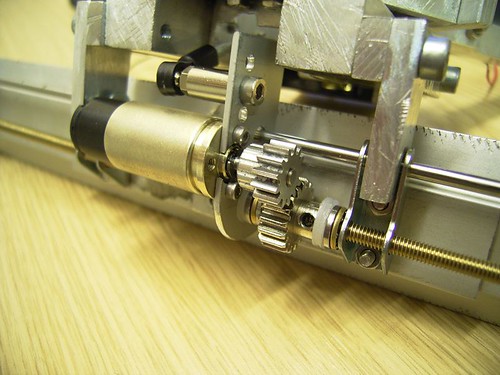 http://www.flickr.com/photos/2207013...7626598857828/ The three servos controlling the drawbar position are operated through "hydraulic modules". These make the stick position proportional to the servos' speed, not their angle. All in all, the following functions are integrated: drive (RB35 ESC) steer (servo) wheel lean (servo) articulation (modified servo, continuous rotation with secondary gear drive) moldboard angle (modified servo, continuous rotation with spindle drive) moldboard sideshift (gear motor with spindle drive) drawbar left height (servo, hydraulic module) drawbar right height (servo, hydraulic module) drawbar horizontal position (servo, hydraulic module) rotation of these three servos around the centre axis (gear motor with hollow gear) circle rotation (gear motor with worm drive, infinite rotation of circle through four-pole stereo plug) front blade (servo arm is lever) rear scarifier (servo arm is lever) That's 13 functions, and assorted cables... 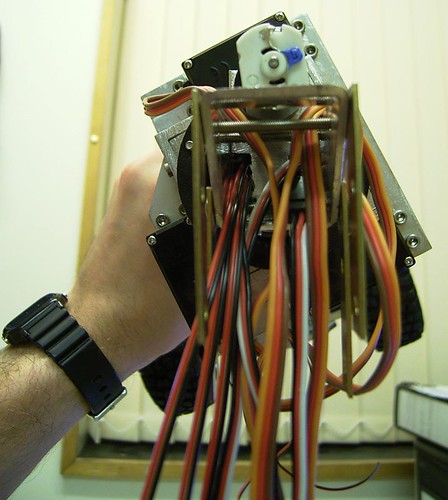 http://www.flickr.com/photos/2207013...7626598857828/ Everything is controlled via two modified Turnigy 9x 2.4GHz transmitters, these are 7.5 channel transmitters. This means I have one proportional and two on-off channels left). Currently I run the standard software, but calibrated the custom sticks I use. They started their existence as Cyborg V.1 flightsticks for flight simulators. Added onto those are Playstation thumbsticks, partly modified to give friction (non-returning) operation. 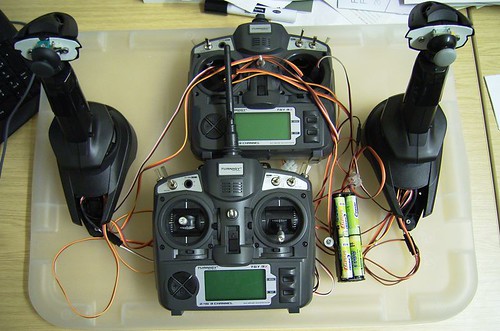 http://www.flickr.com/photos/2207013...7626598857828/ Also modified are the two remaining sticks of the original transmitter. Their vertical axes are the only ones left operational - one has been modified with parts from the other transmitter to give friction operation. This allows easy operation of the two attachments. Driving the machine happens with the left flightstick, so the right hand is free to operate the attachments. 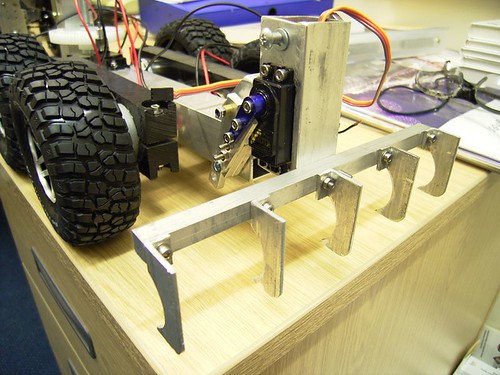 http://www.flickr.com/photos/2207013...7626598857828/ The Bruder model is a slightly older model, but I went for the new user interface of the M-series, hence the crossbreed of flightsticks with thumbsticks  This comes closest to the original user interface, without the use of foot pedals or advanced electronics. Here's a video of the real deal: This comes closest to the original user interface, without the use of foot pedals or advanced electronics. Here's a video of the real deal:http://www.youtube.com/watch?v=2NkATUsfK7Y As it's pretty much done, apart from improving some areas, I cannot provide the joy of a build thread, but if you have any questions, I would be very happy to answer your questions - we need more graders on the parcours  Best wishes Jens |
|
#2
|
||||
|
||||
|
JensR, With the tools you used and the skill that you put your grader together, Well Done!! Welcome. Fred
|
|
#3
|
||||
|
||||
|
WOW Im Speechless!!!
|
|
#4
|
||||
|
||||

|
|
#5
|
||||
|
||||
|
Way cool! I lover the great improvising of parts. The ripper mechanism is really slick

|
|
#6
|
|||
|
|||
|
great build with simple tools.
|
|
#7
|
||||
|
||||
|
Great engineering!
Kerst |
|
#8
|
||||
|
||||
|
Quite the Frankenstein!
 But that is just unbelievable engineering of the radio gear/joysticks!  Looking forward to seeing the upcoming videos of it in motion. 
__________________
Sharing knowledge is one thing that defies basic arithmetic logic --- the more you share, the more you get! Joe |
|
#9
|
||||
|
||||
 I have to second the afore mentioned comments. You have some serious electronic skills there! I have to second the afore mentioned comments. You have some serious electronic skills there!
__________________
Giving up is not an option!!! Rob |
|
#10
|
||||
|
||||
|
Cool machine! looks like a blast to operate.
__________________
Scott "No load is too Small" |
|
#11
|
||||
|
||||
|
Hey Jens, welcome to the forum, You've made a big impression already!
Looking forward to seeing more of your project's! Later, Neil#2 aka doodlebug. |
|
#12
|
|||
|
|||
|
Wow, thanks very much folks
 > Quite the Frankenstein! #hahahaha# Yes, I have sourced bits and pieces from "everywhere". Lots of modified parts from R/C cars (Tamiya, HPI, Traxxas) or circuit-board accessories (spacers and these threaded "stands") and lots of parts from Conrad and some from robotic companies as well as DIY stores. Glad you liked the ripper/scarifier, The Machinist. I changed the design slightly for the front. 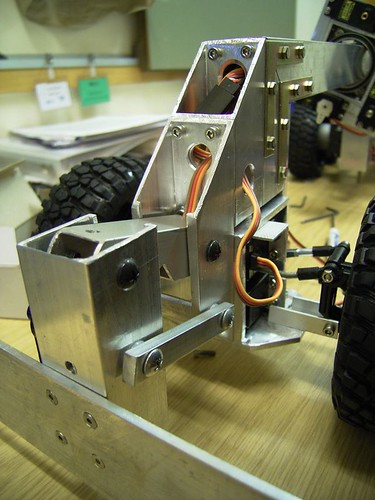 It is a bit more sturdy, but wouldn't easily fit on the rear. The monstrosity that is the lever is rather terrible, in either case: 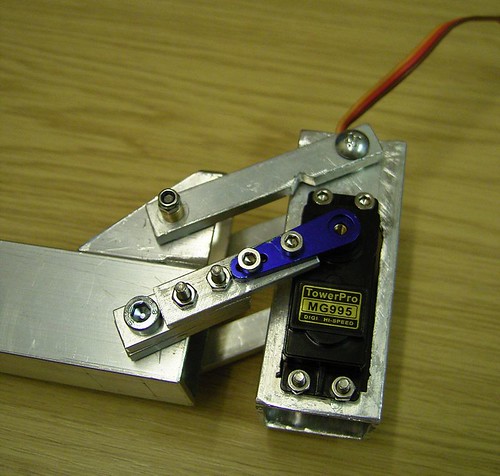 I was thinking of using a low profile servo and sinking it into the 30mm square tube so that only the servo arm sticks out. But these are rated at only half the torque of the full size servo and I am not sure whether I should give it a try. As to the controls: They work great - but I am still learning them. It's not easy to control so many functions. Also I had to set up my transmitters properly so that the controls aren't too twitchy. If you let the servos run at full speed, even a slight twist of the stick will completely change the position. I also added a mixer so that leaning the front wheels still leaves them pointing forwards. BTW, I don't think I'm skilled with electronics - all of this is simple electrics only: Cut the wires to the transmitters' potentiometers, crimp on servo plugs (tedious, but easy), extend cables to joysticks' potentiometers which also get a crimped servo plug and you are done. I've already done a few videos. But they are all pretty bad and flickr's compression does not help. Test in corridor, with improvised controls: http://www.flickr.com/photos/22070130@N07/5190391463 55 seconds of grading: http://www.flickr.com/photos/22070130@N07/5524641557 This one is sped-up, showing what I did to the beach  http://www.flickr.com/photos/22070130@N07/5525285576/ Cheers Jens |
|
#13
|
|||
|
|||
|
very nice i really like it
i like that you built it with what you had or could get i think that some folks forget that this hobby started out with what you could build as there was nothing for sale any where please post more of your equipment and your other RC's thanks again for posting |
|
#14
|
|||
|
|||
|
Thanks!
 I have the utmost respect for people using advanced tools, but there are still plenty of models to be built and fun to be had with simple tools and what we used to call "kitbashing". Thanks very much for your interested in further models, but I don't really have anything else to show. Two crawlers and an unfinished crawler as well as some flat-surface racers. Not even good as a load on a truck... |
|
#15
|
|||
|
|||
|
JensR-sorry for the mis-name.
 I do know the difference between a grader and a scraper. Have you had your model in the dirt yet? I do know the difference between a grader and a scraper. Have you had your model in the dirt yet?
|
|
#16
|
|||
|
|||
|
No worries
 Yes, once in sand at the beach and twice in compost. Works very well, but controlling it is a real challenge. Must get myself a youtube account, uploads to flickr are rather low quality, I assume due to recompression(?), plus I need to cut my videos together. You can find some basic videos from my first test drive at the link above. So, here's my first Youtube video... http://www.youtube.com/watch?v=SZS9mkeum5I I'll have to learn to edit videos, I guess. Cheers Jens |
|
#17
|
|||
|
|||
|
I folks!
I thought an update would be in order  Youtube videos here: http://www.youtube.com/user/YensR Also shows my Arduino-based project to make a transmitter myself. Build pictures here: http://flickr.com/gp/22070130@N07/13BERN Lots of small things amounting to some progress: Needed to crossdrill the wormwheel to prevent it from slipping. Crossdrilled the motor shafts to install 2mm pins and standard 12mm hexes, as the old grub-screw hexes proved unreliable. Then tapped the motor shafts (internal M3) to mount the wheels, as the old fixture with a grub screw collar was really bad. 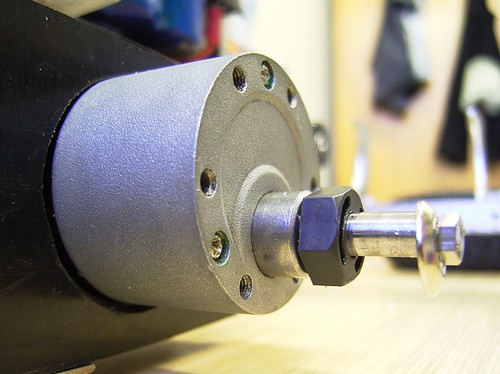 Modified the Slash wheels: 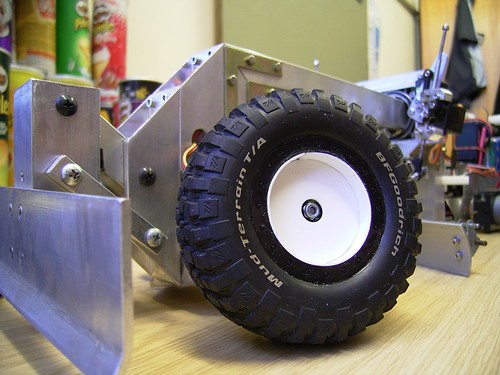 Modified the front and especially the rear implement mechanism: 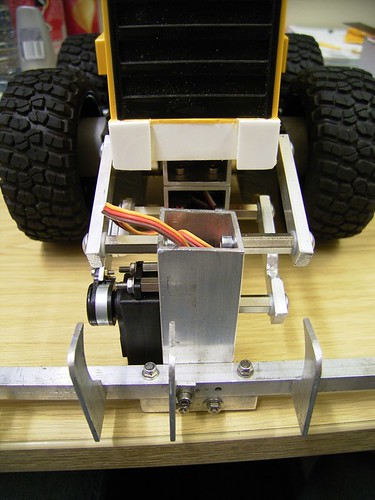 Modified the hood/bonnet 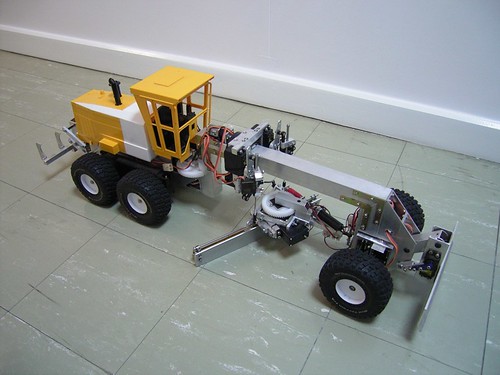 Added mechanical floating positions for both circle lifts: 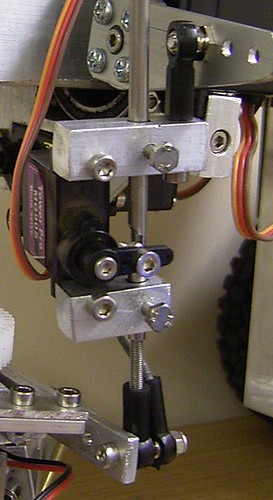 complete with new switches on my joysticks 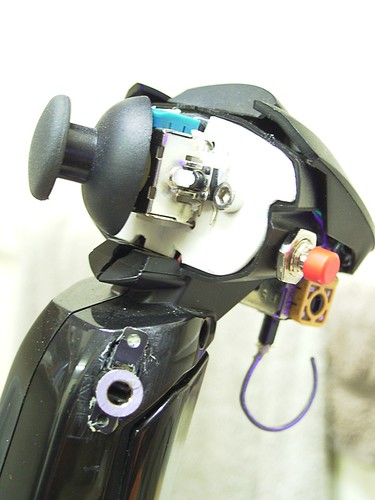 (The red switch is the dual rate, which gives me two driving speeds.) Improved the articulation joint with thrust bearings Currently I am working to get my driven front axle going, it's looking promising: 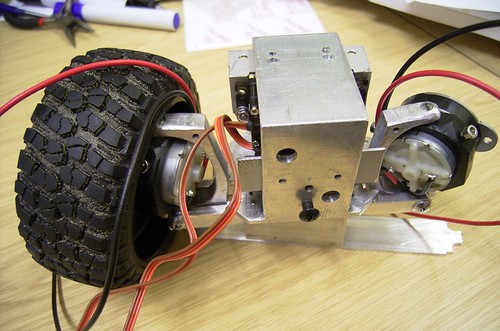 Cheers Jens Last edited by JensR; 10-11-2011 at 08:50 AM. |
|
#18
|
||||
|
||||
|
Wow! Very impressive! I always like seeing what people can create with the most basic of hand tools. You've done a great job, with the bare mininum, and you should be very proud. It might not be 100% scale, but it runs like it's supposed to!
The joystick control is equally amazing. I can see you have some great electrical abilities!
__________________
Nathan |
|
#19
|
||||
|
||||
|
Timelapse video was way too fast!!! Can you cut the speed of the vid in half or more plz?
 I'd like to see you work the controls. I'd like to see you work the controls. 
|
|
#20
|
|||
|
|||
|
Thanks guys!
The timelapse videos are of course only intended to give an idea how the terrain is changed by the grader. I uploaded two new videos. Here's the control of the grader: http://www.youtube.com/watch?v=Kz77vpSWsjk And here's the driven front axle with wheel lean. http://www.youtube.com/watch?v=VjHcA7xACFU I think this is the first model of a motor grader that combines 6x6 and wheel lean  I wanted to do this straight from the start, but did not find motors short enough. Took quite a bit of CAD to get the dimensions right - plus my jigsaw complained about the 10mm aluminium... Looking forward to giving this a whirl in the dirt! Cheers Jens Last edited by JensR; 10-15-2011 at 04:25 AM. |
 |
| Tags |
| bruder, caterpillar, grader, modification, transmitter |
| Currently Active Users Viewing This Thread: 1 (0 members and 1 guests) | |
|
|