 |
|
|||||||
| Construction Equipment If it digs, pushes, hauls dirt "off road" post it here. |
 |
|
|
Thread Tools | Display Modes |
|
#1
|
|||
|
|||
|
I'm working on up grading a Diecast Masters 49X White Western Star.
I really liked the look of the truck the retail is around $239 so cheap by RC standards but a pricey toy for a cheap skate like me...especially since the first thing I do is open it up and gut it.... The truck looks great for the price but it does have it's short comings and strong points so I'll start on the positive... The dump bed is pretty big and the system to raise and lower it seems to handle a full load of dirt so that part is pretty strong . The drive system also has no problems driving around with a full load of dirt... It's got headlights, tail lights turn signals, and back-up lights and sound... ish Did I say it was really shiny ... And if you have ever tried to take a Bruder apart for a conversion you'll appreciate the fact that this thing comes apart with ease... Ok.. the down sides... The steering sucks...on mine anyway kind of all or nothing. The dump system is powerful but not very realistic looking it runs off 2 wheels and if you hold the control in the up position it just keeps going up and down.... The drive systems is strong but SUPER fast and touchy dead stop to full speed with just a tiny movement on the throttle not very realistic . And the tires are really hard so traction can be a real issue.... So the bad points need fixed nothing a receiver, servo, a couple ESCs, light kit, tires and rims and home made 3D parts can't fix... Here is what we start with.  I'm not going to go into a lot of detail on how to get it apart because it's pretty simple there are a hand full of screws to take out and the thing comes apart... there is a U-Tube video that goes into detail on it but it's pretty straight forward... and you end up with this.  This is a pretty straight forward upgrade there is plenty of room to work with. I plan on using a HW 1060 ESC for the drive and a cheapy 30a ESC for the dump bed. Steering will get a Tower Pro 996 and some custom made 3D parts (I'll put them on thingiverse in the next few days so if anybody wants to do this conversion they can. |
|
#2
|
|||
|
|||
|
First thing we need to do is get all the innards out....
 After doing the Bruder delta loader and the D5 this thing has a ton of room both in the chassis and under the hood. I cleaned out the plastic stand-offs the old circuit board used and that left a nice open place for my ESCs... I think I'll put my Receiver and new light kit under the hood here... after I clean it up some. I left the speaker in place, I'm going to try putting sound in this one and I'll use the stock speaker.  Like this  The stock servo is kind of weird shaped but at least stock width, so I just took out a little plastic at the base to fit the tower pro in... then the stock upper piece fit right back on.  Fitting the ESCs in and the new on/off switch, I didn't put a charging jack in this one since the batter is easy to get out, but I wanted a master on/off, you can see it in the corner.  This was going to be a pretty simple upgrade...just some ESCs, receiver, servo...then I saw some things that I wanted to fix.... The new servo didn't stick out as far as the old one so the servo horn didn't reach the stock steering rod....so I decided it was time to create some parts with my new 3D printer and just enough CAD knowledge to be dangerous....so that is the next step in this build...all the electronics were straight forward since you don't have to change the drive motor or bed lift... I will have to figure out something for the lights since the light and sound control were on the old mother board. I don't want to try and hodge-podge the old board in plus it takes up to much room.... |
|
#3
|
||||
|
||||
|
Sharp looking dumptruck! Looks like you're really making some progress with it
Should be fun to see how it stacks up against your WPL Tonka
__________________
What do ya mean "Cars are neither Trucks or Construction"? It's still scale, and i play fairly well with others, most of the time... |
|
#4
|
|||
|
|||
|
It is a nice looking truck...it just had some issues....nothing all that hard to fix....
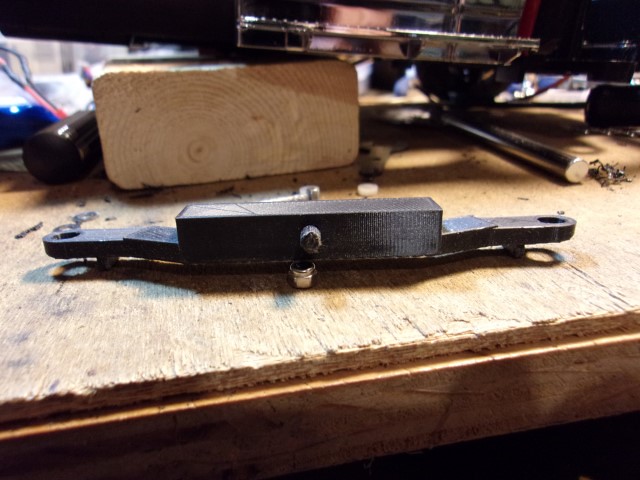
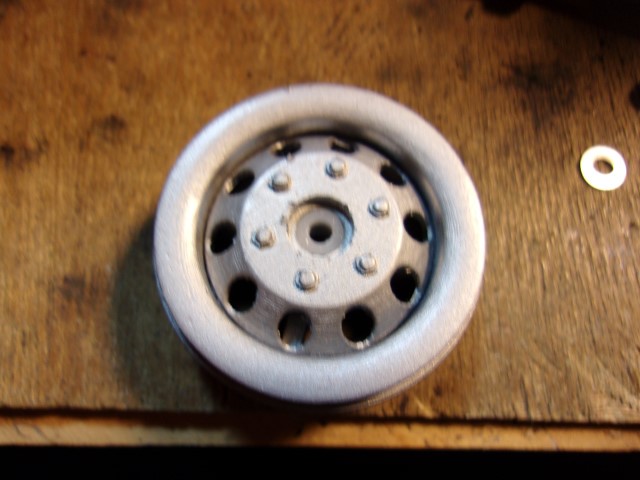
Ok the ESCs are in and the servo is fitted but it's to short there are a lot of different ways to fix this but I decided I'd try making a servo horn in tinker cad and printing it....and here is what I came up with..it sticks out far enough to engage the steering arm ( or whatever you call this piece)   I needed the slot because the steering arm moves around as it goes right and left... Then I decided why not make a new steering arm...this way if this part wears out I can just print another.  Here are both pieces installed. they WORK... I was amazed...  So with my new found confidence I decided to make some new stub axles.The stock ones are pressed together with a rivet of some sort, there is no way to replace them if they wear and they are a wobbly fit...so I made these.  I cut up an old WPL axle that was in a plastic housing and made a m3x35mm stub axle this donar also gave me 4 nylon bushings ( the WPL bearings are the same size ) 3x5x2.5 so I can put actual bearing in it if I want... I cut the axle and tapped each end then JB welded a nut on one end. I made the fit tight so I had a good pressure fit.   Well now I have this set up...the stock wheels won't work...so....I hunted around on Thingiverse and found a wheel that "kinda" looked like the stock wheel and resized it and put some bearing recess in it front and back. This was my first attempt at making anything that required a precision fit...and it worked...These are just a quick test run to make sure it would work. Front  Back  These use the stock tire, I let the bushings sit a little proud so the nylon would ride against the PLA these are far better than the stock pieces.....I also beefed up the piece so it fit snugly on the top and bottom mount so there is far less play but it still works smoothly. I've also thought about using m3 threaded rod and making the tie rods so they are adjustable and may at some point but this first try I wanted to keep the stock looking stuff so you don't have to change anything on the truck to do these mods. I posted the STL files on Thingiverse if anybody wants them... |
|
#5
|
|||
|
|||
|
Frizzen this truck is stupid fast....and the drive motor are plenty strong, My Tonka is going to get a make over soon, now that I have learned a little more I know how to make it better...I'll post some pictures when I get this one done.
|
|
#6
|
|||
|
|||
|
Just finishing this up....
I got the front wheels looking decent...along with the other front suspension pieces....     Not perfect but they will work for me.... I got the lights working, I used this light kit... It says Tamiya but I think it's a Chinese knock off.... It's been reviewed on Utube and others came to the same conclusion... anyway for $13 I was able to get Head lights/tail lights, Turn signals,Back-up lights... you just have to move the wires around a little....  The labeling doesn't make sense but I'll try and explain it a little. I used some of the original lights from the truck and some lights from the kit the voltages are pretty close from both. The kit has 3 rows of 4 plugs in groups of 2... starting from the upper left corner . First 2 are connected to a wire labeled Ch 3 I connected all 4 head lights to one plug and the tail lights to the other. The next 2 in the top row and break lights I didn't use these at this time because I was running out of room in the back of the truck. First 2 in the middle row are turn signals (left and right), I ran these to the front Second 2 in the middle row are Back-up lights. First 2 in the bottom row are another set of turn signals (left and right) I ran these to the back The last 2 on the bottom are lights that come on when you move forward, they are blue so I'm going to put these in the front bumper as running lights. I haven't done sound yet, I kept the original speaker in place and will probably use a knock off board at some point... but for now It's ready to put in the dirt.... |
|
#7
|
|||
|
|||
|
Those wheels came out nice! I’m getting anxious to get my hands on a printer and start playing around.
|
|
#8
|
|||
|
|||
|
Thanks....!!
I know they are not 100% accurate but they are straight and have replaceable bushings/bearings and once I get it in the dirt you'll hardly notice... Yeah, once you get a printer and start trying things you'll be hooked..... |
|
#9
|
|||
|
|||
|
Oh yeah... If anybody wants them the parts are on thingiverse search
Diecast Masters 49X upgrade |
 |
| Currently Active Users Viewing This Thread: 1 (0 members and 1 guests) | |
|
|