|
|||||||
| Highway Trucks and Trailers On road trucks and trailers single and twin axle trucks. |
 |
|
|
Thread Tools | Display Modes |
|
#81
 06-22-2012, 04:40 PM
|
||||
|
||||
|
Hi guys,
No big news here, just to let you know the latest moves. The truck is dismantled now for frame painting. I take that occasion for remaking the back door, (didn't like the old one...) add an alu frame on the window and bars beside: 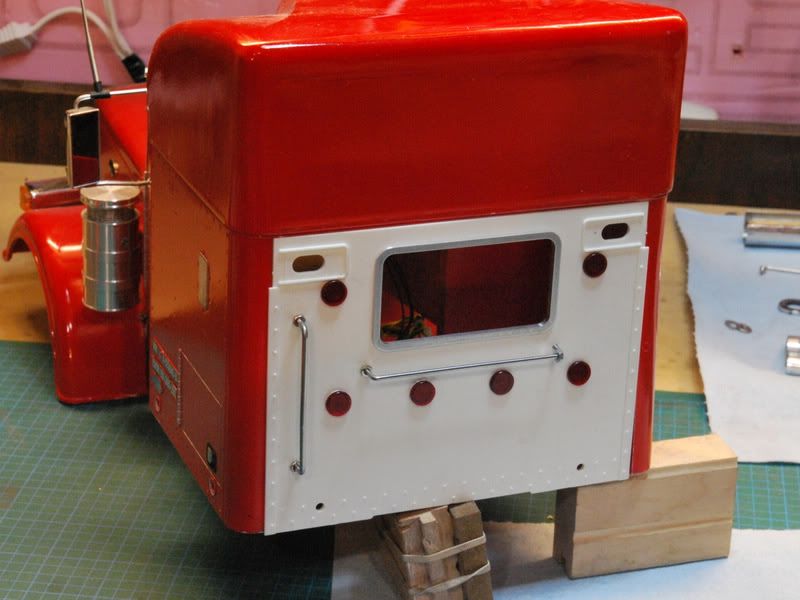 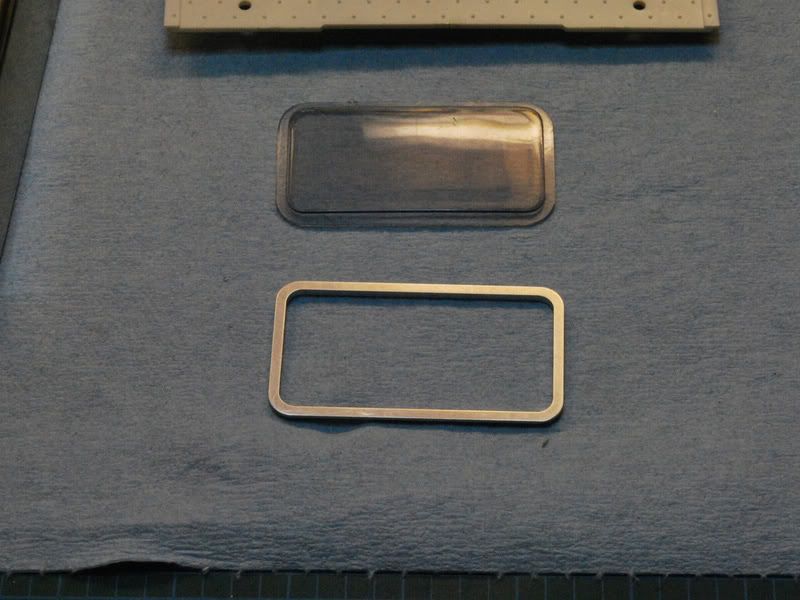 I also made a pic of most of my own realisation (not machining art, but I'm satisfied with the results): 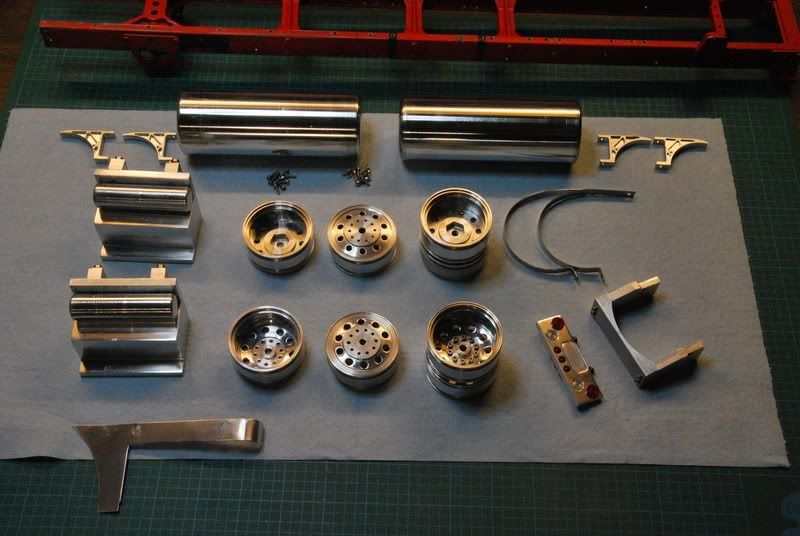 And I change the exhaust cover for these ones: 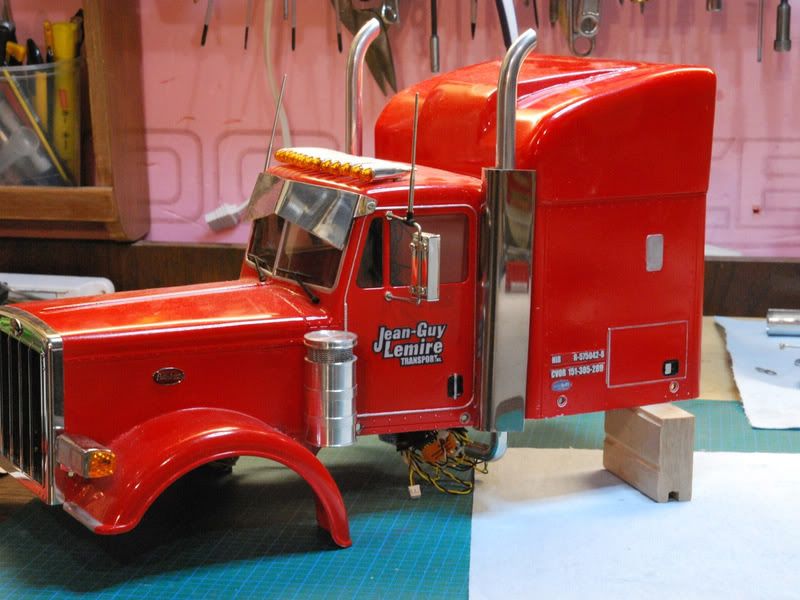 See you later, thanks for viewing!
__________________
To view links or images in signatures your post count must be 10 or greater. You currently have 0 posts. To view links or images in signatures your post count must be 10 or greater. You currently have 0 posts. 
|
|
#83
06-22-2012, 09:34 PM
|
||||
|
||||
|
Is the rear window machined from clear plastic?
__________________
"My son will have a chocolate milk" -J.P. Next East Coast Minitruckers Meet: Arioch
|
|
#84
06-23-2012, 08:56 AM
|
||||
|
||||
|
Quote:
__________________
To view links or images in signatures your post count must be 10 or greater. You currently have 0 posts. To view links or images in signatures your post count must be 10 or greater. You currently have 0 posts.
|
|
#85
06-23-2012, 11:14 AM
|
||||
|
||||
|
Shiny parts are always a plus
Nice job so far Alfy
|
|
#86
06-23-2012, 11:30 PM
|
||||
|
||||
|
How did you write in those clearance lights with the mfu? That's a lot of new shiny parts! Looking good
__________________
Hi my name is Aaron.... And i'm a truckaholic!
|
|
#87
06-26-2012, 01:00 PM
|
||||
|
||||
|
Hi Dabears,
I don't remember exactly how it was connected. I tried to verify directly but it's not easy to see  . I'll try to find if I took notes about the wiring and if it's not I'll check it deeper. . I'll try to find if I took notes about the wiring and if it's not I'll check it deeper.What I can say is that I used two connectors, so I connected seven leds on one and six on the other. Each ones are connected on the mfu with the roof light plug and the speed indicator plug. The speed indicator is desactivate by the control panel. The leds are connected in seried and parallels, but I can't remember exactly how and because the wires are almost all black, I have to dismantled tie-wraps (not a very clean installation...) to see the wiring way... If it's possible, it will be easier with my notes... 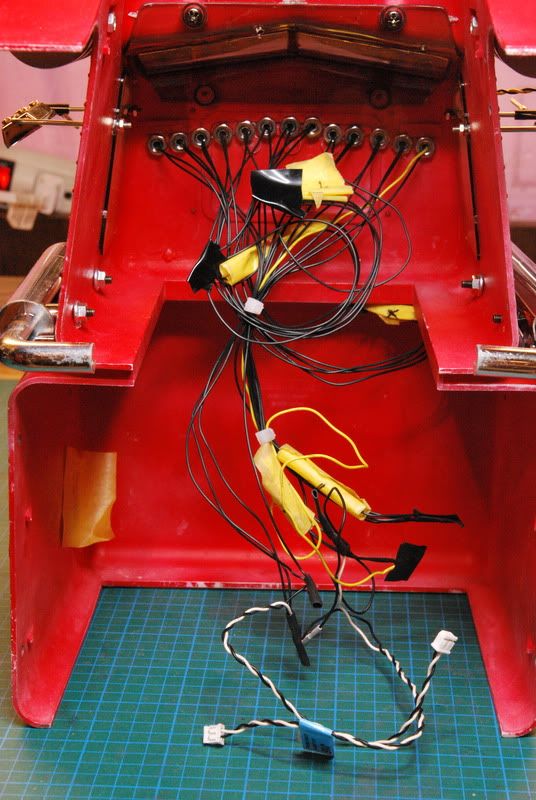 Another thing I want to say is that I'm not sure about the safety of this wiring way, but it work well for me till now! The best way is to use a relay (I can give you a specific model) ans a separate battery... I'll try to give you more infos asap.
__________________
To view links or images in signatures your post count must be 10 or greater. You currently have 0 posts. To view links or images in signatures your post count must be 10 or greater. You currently have 0 posts.
|
|
#88
06-26-2012, 03:44 PM
|
||||
|
||||
|
Ok cool don't worry about taking all apart... I can test the output voltage of the mfu to find my forward voltage and wire accordingly.. Thank you for the pics it does help alot!
__________________
Hi my name is Aaron.... And i'm a truckaholic!
|
|
#89
06-26-2012, 04:37 PM
|
||||
|
||||
|
Good... I'll probably take advantage of dismantling for taking notes on the wiring for myself if I don't find my own notes...
") Can be usefull! Just be aware of on thing I see: Voltage on the mfu output seems to fluctuate, like if it have internal resistors... Can be usefull! Just be aware of on thing I see: Voltage on the mfu output seems to fluctuate, like if it have internal resistors...I'll keep you inform anyway!
__________________
To view links or images in signatures your post count must be 10 or greater. You currently have 0 posts. To view links or images in signatures your post count must be 10 or greater. You currently have 0 posts.
|
|
#90
06-26-2012, 06:43 PM
|
||||
|
||||
|
Quote:
 thanks thanks
__________________
Hi my name is Aaron.... And i'm a truckaholic!
|
|
#92
07-03-2012, 12:14 PM
|
||||
|
||||
|
Thanks Crewcab59!
Primer job is done on frame but my I broke my airbrush fitting while preparing things for painting red!  Don' have time to get a new one, so I tried do "repair" it... Hope it will work... Don' have time to get a new one, so I tried do "repair" it... Hope it will work...  Dabears, here's the way I think I configured my roof light (pdf joined). I can't be sure because I didn't note the polarity on wires and I'm not good enough with electronic to assure there's no other logical way... But it's the real wiring, with 8 leds on a connector and 5 on the other. Worked well for me till now, but not sure it doesn't have bad effects on circuitry or leds... Take care. A better way should be using a separate circuit with a servo switch like this one: http://www.robotmarketplace.com/products/0-PICOSW1.html. Hope it help! Gaetan
__________________
To view links or images in signatures your post count must be 10 or greater. You currently have 0 posts. To view links or images in signatures your post count must be 10 or greater. You currently have 0 posts.
|
|
#93
07-11-2012, 09:26 PM
|
||||
|
||||
|
Hi gang!
Here's the latest developpements in the "rebirth" of my King: The repainted frame, with the news alu parts: 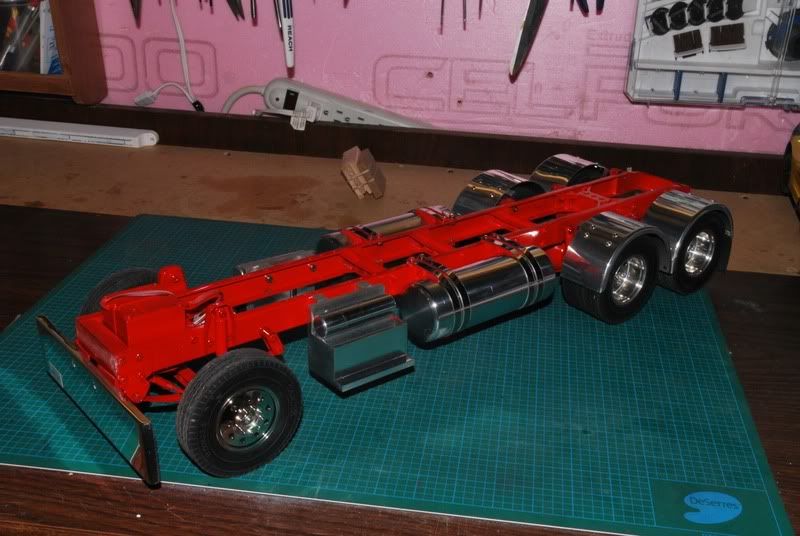 New rear parts: 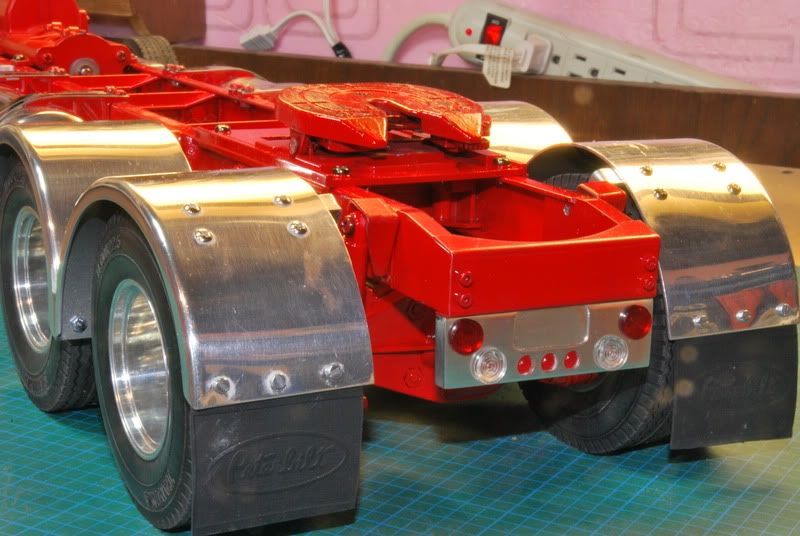 A close-up of the way I used for installing fenders on axles instead on the frame: 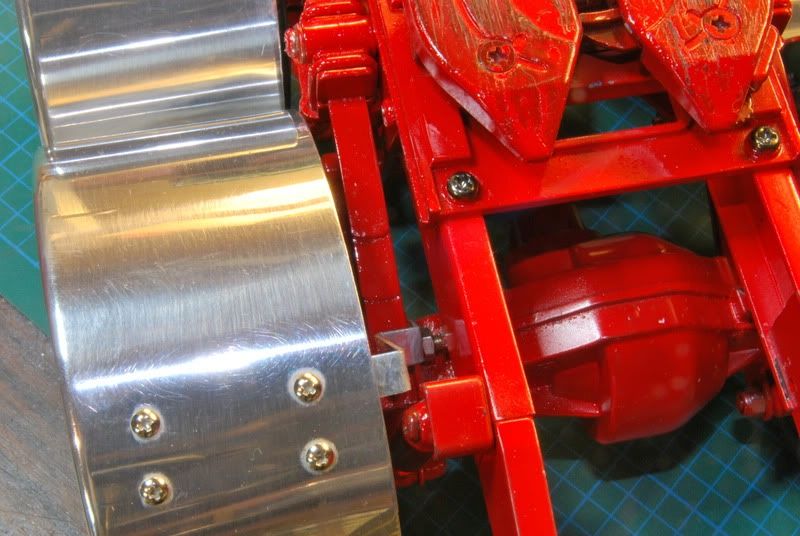 Tanks straps on their supports:  A little view of the new driveshaft: 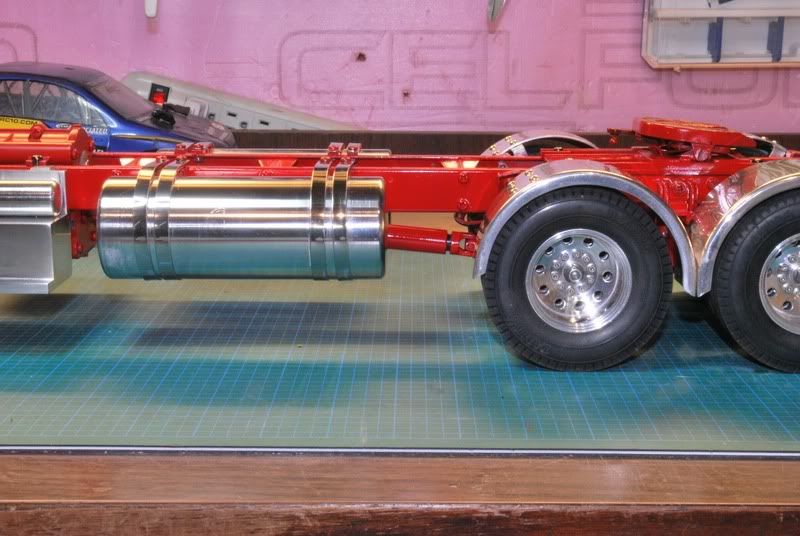 Thanks for viewing!
__________________
To view links or images in signatures your post count must be 10 or greater. You currently have 0 posts. To view links or images in signatures your post count must be 10 or greater. You currently have 0 posts. Last edited by B-Train Hauler; 07-11-2012 at 09:53 PM. Reason: Error on a picture link.
|
|
#94
07-11-2012, 10:03 PM
|
||||
|
||||
|
Looking awesome!! i do like how you mounted the fenders little different from the way i did, i like it though keep up the great work!!
__________________
Hi my name is Aaron.... And i'm a truckaholic!
|
|
#95
07-12-2012, 05:46 PM
|
||||
|
||||
|
Thanks dabears!
I think your way for mounting fenders seems better , because it doesn't put any stress on the spring movement, although I considered it in my installation.This forum is a wonderful place to learn!
__________________
To view links or images in signatures your post count must be 10 or greater. You currently have 0 posts. To view links or images in signatures your post count must be 10 or greater. You currently have 0 posts.
|
|
#96
07-12-2012, 09:22 PM
|
||||
|
||||
|
I tried mine the way you did yours but my fenders have no play in them being hard plastic so with the suspension flex it put a lot of stress on the fenders or i would have done it the same as you. love your truck!! cant wait to see more
__________________
Hi my name is Aaron.... And i'm a truckaholic!
|
|
#97
07-12-2012, 10:57 PM
|
||||
|
||||
|
I see what you mean but there's another reason to prefer your way. Mines have some flex between them instead of yours and it's relatively ok about the stress between them, but after a while some misalignment appear. Not so bad and not so fast, but your way should eliminate that too. A change is really considered here... another item in the todo list
PS Love your your globe & lowboy set too! 
__________________
To view links or images in signatures your post count must be 10 or greater. You currently have 0 posts. To view links or images in signatures your post count must be 10 or greater. You currently have 0 posts.
|
|
#98
07-12-2012, 11:21 PM
|
||||
|
||||
|
The new aluminum parts against the red really looks good.
 Now hurry up and the this beautiful truck assembled. Now hurry up and the this beautiful truck assembled.Big John
__________________
To view links or images in signatures your post count must be 10 or greater. You currently have 0 posts. To view links or images in signatures your post count must be 10 or greater. You currently have 0 posts. To view links or images in signatures your post count must be 10 or greater. You currently have 0 posts. YOU WANTED THE BEST AND YOU GOT THE BEST THE HOTTEST BAND IN THE WORLD...KISS!!!!
|
|
#100
07-13-2012, 02:56 PM
|
||||
|
||||
|
Quote:
! I wish to be one day a "three weeks state of the art modelers" but not really sure if that will be... Too much to learn I think , and I never be a "top of the class" student Lol!Quote:
...Quote:
Gaetan PS. Hem... as always, sorry for my poor english knowledge, but this forum is a so great one...
__________________
To view links or images in signatures your post count must be 10 or greater. You currently have 0 posts. To view links or images in signatures your post count must be 10 or greater. You currently have 0 posts.
|
|
| Currently Active Users Viewing This Thread: 1 (0 members and 1 guests) | |
| Thread Tools | |
| Display Modes | |
|
|


 Linear Mode

