|
|||||||
| Construction Equipment If it digs, pushes, hauls dirt "off road" post it here. |
 |
|
|
Thread Tools | Display Modes |
|
#41
 04-18-2013, 10:01 PM
|
||||
|
||||
|
Nice work Jason ..The way i see it is your making a good thing even better ..Im always looking at ways to improve or make my stuff work better ..Hey can I come over make parts in your shop too ..lol

|
|
#42
04-19-2013, 07:28 AM
|
||||
|
||||
|
Keith, thanks for checking in and the nice comments. I hope it turns out to be a nice model. Thanks again.
Lou, thank you, me too. Even if this machine was in great shape id probably still have tried to rebuild it somehow....and anytime.
__________________
Jason
|
|
#43
04-19-2013, 05:32 PM
|
||||
|
||||
|
The Friday Update...
Drilling out broken screws. Threadlocker and painted screw heads always make for a great time..CAD drawing of hole pattern to assist in finding centers in the mill.  On to something much more cool. Piece of 1/2" flat stock.          Finally starting to look like something. Might have some free time this weekend to get the front end completed and move onto the rear half.
__________________
Jason
|
|
#44
04-19-2013, 11:34 PM
|
||||
|
||||
|
Jason, I'm enjoying this project of yours! I'm learning some new things too. I thought you were pretty talented to be making a cab with a 3D printer, but that's only a small piece of it. You're a heck of a machinist too. The new loader arms and bucket bell crank (is that what they call them?) look really nice together. I'll be checking this thread over the weekend to see what is yet to come!
__________________
Nathan
|
|
#46
04-20-2013, 04:26 PM
|
||||
|
||||
|
Did you modify the length of the bell crank at all to compensate the added length of the arms?
__________________
Sharing knowledge is one thing that defies basic arithmetic logic --- the more you share, the more you get! Joe
|
|
#48
04-21-2013, 08:33 PM
|
||||
|
||||
|
So after experimenting a little today working out the movements on the bucket with the 1/2" longer arms, I determined the length of the conecting rod from the bell crank to the bucket needed to be lengthened 1/2" also. This worked well through out the buckets movements except when in the full up position and bucket dumping. The center pin location on the bucket for the connecting rod was just about on the same plane as the pins for the arm attachments point on the bucket. This caused the movement of the bucket to bind when turning up from the dump position. I employed the use of the printer and mocked up a connecting rod and block to try different pin positions on the bucket as i knew i had to raise that connecting point up above the arm pins to fix the dump bind.
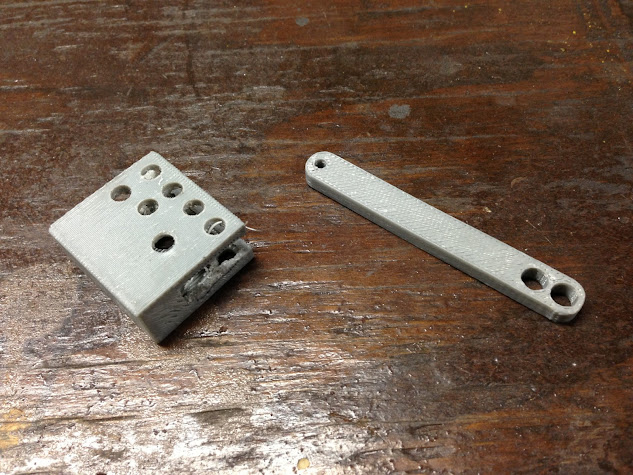 New mount .400" higher center to center pin location. All up and down movements are smooth with no bind now.  New solid connecting rod.   Arms full up , bucket full down  Bucket full up  
__________________
Jason
|
|
#49
04-21-2013, 08:38 PM
|
||||
|
||||
|
That's some beautiful machining Jason! The new bucket bell crank mount turned out nice! Any idea what the max reach is now at? Assuming you may have mounted or measured the rims and tires, just to get an idea.
__________________
Nathan
|
|
#50
04-23-2013, 05:30 PM
|
||||
|
||||
|
Thanks Nate! The height difference is only about 1/2" higher. Haven't got far enough to mount the wheels again to check. Figured if needed a bit more I could get that with a quick disconnect if I make one later.
Didn't do this before but should've taken a stock measurement and weight before disassembly. Anyone reading who may have that post it please so I can compare. Thx
__________________
Jason
|
|
#52
04-24-2013, 03:42 PM
|
||||
|
||||
|
Dabears, Thanks Man!
Here are a few new pics of some progress. turned up 2 rear axle pivot bolts for the new rear lower half.    Hinges for the rear  New mounts for the pump, block and reservoir. I wanted to tidy things up a little. Everything was just floating around and a tangled mess before. BEFORE  NOW     Starting to put on some weight.
__________________
Jason Last edited by JDH429; 04-24-2013 at 03:55 PM.
|
|
#54
04-24-2013, 05:44 PM
|
||||
|
||||
|
Nice work. How much more than stock do you think it weighs?
__________________
RIP FGD 12-19-11 To view links or images in signatures your post count must be 10 or greater. You currently have 0 posts.
|
|
#55
04-25-2013, 01:38 AM
|
||||
|
||||
|
Great job mounting the hydraulic components! I think that's a lot better then having them slide around in the belly of the machine. Looks like you'll still have plenty of room for a battery and the electronics too.
__________________
Nathan
|
|
#56
04-25-2013, 11:04 AM
|
||||
|
||||
|
The components did not slide around on the belly of the model, the pump & valves are in fixed locations... and more importantly, the pump is fixed at an angle so the inlet of the pump is always submerged in oil.
I see the pump was previously mounted correctly in this picture with it's kit supplied mount at a downward angle, why did you not retain that mount or something similar?
__________________
Sharing knowledge is one thing that defies basic arithmetic logic --- the more you share, the more you get! Joe
|
|
#57
04-25-2013, 12:37 PM
|
||||
|
||||
|
Nate, Thank you, Yes theres plenty of room for electronics in the rear end.
Joe, Good observation. You saved me some trouble with that. The valve block and reservoir were loose and floating around when i got it.
__________________
Jason
|
|
#58
04-27-2013, 08:52 AM
|
||||
|
||||
|
Thanks to Lil Giants suggestion and my oversight, I made a new pump mount. Also started on the cab but didnt get too far before my welder died. So it will be a few weeks until i can get anymore body work done until the welder is fixed. In the meantime i got some parts powder coated and a few other things done.
 Paint cleaned off cylinders        Made a mount for the articulating cylinders.  Parts just out of the tumbler     Chasing threads. I find this the cleanest way to deal with threads when powdercoating. Larger holes are easily plugged.   And partially assembled to get an idea of what its gonna look like. I changed the direction and am heading towards a later WA500 look with these colors, cab and the rear hood will be slanted in the rear instead of straight back.  The yellow is actually closer to the 1:1 picture than it looks here. 
__________________
Jason Last edited by JDH429; 04-27-2013 at 09:01 AM.
|
|
#59
04-27-2013, 09:22 AM
|
||||
|
||||
|
Nice job! Too bad your welder died! It's exciting to watch a machine come together as fast as this one. I like the idea of updating to a newer more current model too. It will further separate yours from the original!
Reg
|
|
| Currently Active Users Viewing This Thread: 1 (0 members and 1 guests) | |
|
|


 Linear Mode

