 |
|
|||||||
| Construction Equipment If it digs, pushes, hauls dirt "off road" post it here. |
 |
|
|
Thread Tools | Display Modes |
|
#1
|
||||
|
||||
|
Hi to all,
I’ve been a member for alittle while now on scale 4x4, I was completely new to the R/C scene when I joined. I found a really big interest in the construction models, seeing all the great conversions/builds, I had my eyes set on the hydraulic models after seeing some great vids of them, but they are rediculously priced!  I still had the bug for construction models, and I knew that the cheaper end of the market would struggle even to lift dust  , so thats why I set to and made my own, even though it's not powered by hydraulics (because even that is expensive!) I got a few tips from Pumptech and made screwdrives. Here's the first project I attempted (back in the beginning of sept 2011), I guess it was a prototype , so thats why I set to and made my own, even though it's not powered by hydraulics (because even that is expensive!) I got a few tips from Pumptech and made screwdrives. Here's the first project I attempted (back in the beginning of sept 2011), I guess it was a prototype  with alot of trial and errors! with alot of trial and errors!I finally had a moving piece and it worked pretty well! but there were a few (actually alot  ) of errors and things that needed adjusting , and I didn’t actually finish it completely. Being my first attempt I didn’t know how it would turn out, so here is where I got to on it, with a vid aswell to show it working. I took the vid when I had just finished it, so it's abit twitchy here and there getting used to the controls/directions. ) of errors and things that needed adjusting , and I didn’t actually finish it completely. Being my first attempt I didn’t know how it would turn out, so here is where I got to on it, with a vid aswell to show it working. I took the vid when I had just finished it, so it's abit twitchy here and there getting used to the controls/directions.Please see my youtube vid: http://www.youtube.com/watch?v=IdogOGNY1GE Last edited by Jigglepin; 02-11-2012 at 04:42 PM. |
|
#2
|
||||
|
||||
|
Then I decided to have another go, this time knowing what I wanted to achieve. I completely took it apart and started from the ground up. It’s taken me a few months (since October/November 2011) and managed to take pics of the process.
So, the first thing I made was the tracks and wheels, These are constructed using 6mm (track segments) and 12mm (wheels) MDF. The track segments are 45mm long and 25mm wide, I had to cut out each one individually using a bandsaw. There are 32 segments per track, 64 in all. 2 holes were drilled in each segment (thats 128 holes!) to allow for the small nut to pass through, allowing it to be fixed via a small chain. The wheels were merely cut using a hole saw, I cut 2 segments of 12mm MDF and stuck them together to give me a thicker wheel. I used aluminium tubing as inserts for the wheels, for the shaft to pass through. As over time the shaft would damage the hole in the MDF and cause play. The shafts are 6mm steel tubing which I thread at each end for a nut, to hold the wheel in place.    
|
|
#3
|
||||
|
||||
|
The next pieces were for the main body, I'm using 18mm and 6mm MDF. I used a bandsaw to cut them length ways and a chop saw for the width. It measures approx 60mm wide and 300mm long. The shorter ones are about 200mm long. The reason for the space at the rear,is for the cab.
Next, I marked out the shape for the front with the different angles and carefully cut them using the bandsaw, the holes for the main bucket arms and servos were measured and drilled. Also the holes for the wheel shafts, again using some aluminium tubing I inserted them with a tight fit into the MDF. The shafts themselves wont be turning, the rear wheel will be driven directly from a servo using a chain and sprocket, so the wheel will just turn on the shaft.      
|
|
#4
|
||||
|
||||
|
Wow, that's really impressive for your first try. Loader works nice and smooth with the screw drives. Great model!!!
Rob |
|
#5
|
||||
|
||||
|
Next, I decided to make the business part of the loader, the main arms for the bucket, and the mechanism for the bucket tip. These are all the pieces I went through using just trial and error to what worked and what didn't
  After a few long hours, I was happy and marked out my final pieces using 6mm MDF, using my trusty bandsaw and my 10 fingers!  I carefully cut out the shapes. I cut as close as possible to the line but not to far, because after all the cutting I used a small sanding wheel on the pillar drill to tighten up all the curves and awkward areas of the pieces. All the necessary holes were drilled in each piece. I carefully cut out the shapes. I cut as close as possible to the line but not to far, because after all the cutting I used a small sanding wheel on the pillar drill to tighten up all the curves and awkward areas of the pieces. All the necessary holes were drilled in each piece.    
|
|
#6
|
||||
|
||||
|
The next piece was for the the bucket tip mechanism, I'm not sure if there is a specific name for it
 . This time I'm using softwood, because of the small nature of the part, MDF would just split. They all measure 15mm cubed and the longer piece is 60mm, the small blocks are held in place by a screw for position, then I used araldite for a stronger fix. The holes were drilled for a 3.2mm piece of steel rod. . This time I'm using softwood, because of the small nature of the part, MDF would just split. They all measure 15mm cubed and the longer piece is 60mm, the small blocks are held in place by a screw for position, then I used araldite for a stronger fix. The holes were drilled for a 3.2mm piece of steel rod.   
|
|
#7
|
||||
|
||||
|
Now here's some pics of the mechanisms together, and starting to take shape in what they are for. I decided that the pieces I had were abit flimsy , so I made them more solid using thicker MDF and sticking the parts I had to it. With alittle sanding they blended together. All of the pieces fixed together to make up the bucket arm assembly.
      
|
|
#8
|
||||
|
||||
|
As you can see it's starting to take shape! At this stage It doesn't have any drive so thats the next thing, then it's the cab which is going to be alittle tricky. I'm thinking I might attempt making a bucket from scratch (using wood of course!
 ) )     Here is a vid I did once it was up and running, and I'd started the cab area on the rear. http://www.youtube.com/watch?v=5npvXjg8FTg Last edited by Jigglepin; 01-31-2012 at 04:33 PM. |
|
#9
|
||||
|
||||
|
I decided to put together some track support wheels, I found the tracks started to sag abit and it kept getting caught! and also it finishes off that area quite nicely.
I used a block of soft wood to fix to the main body and to which it will hold the track wheel assembly in place, cut some small 6mm thick MDF and shaped them acordingly, a ndsoft wood for the small parts inbetween the wheels for a means of screwing it together.       
|
|
#10
|
||||
|
||||
|
I've also boxed in the top, again using 6mm thick MDF. It is made up of different sections which I had to cut and angle. A belt sander came in very handy (because cutting those sort of angles on a band saw would have been a nightmare!), so I just cut roughly before the pencil line. Then using the sander I could get the fine angle I needed. I screwed it all in place, then glued the pieces together. So when it's unscrewed it will be one piece.
I know it doesn't look to pretty at the moment! with the screws and all. When I come to painting it I'll tidy it up and sand it where required, then when it's painted it should hopefully blend in.   I took some pics of the piece on it’s own after I’d glued it together, It’s made of 4 different sections. I used araldite to hold it together and it still needs to be sanded to get rid of the excess glue and to tidy it up.  
|
|
#11
|
||||
|
||||
|
I have made some progress on the cab area. I used some 24mm thick MDF for the little dash board, gave it abit of shape and angled the top (when it’s painted, I’m going to see if I can get hold of some stickers of dials etc)
  Next using 24mm MDF again I cut some blocks, marked out and cut the stair shape. Then once in place I used the bandsaw to cut most of the excess off, then used the belt sander to shape them.     
|
|
#12
|
||||
|
||||
|
The next stage was the little seat and ‘arm rests’, I used 12mm MDF for the base and 6mm for the back and ‘head rest’. I cut the simple shapes first, then shaped them giving it abit of character. Then glued the pieces together. The ‘arm rests’ again were made from small blocks, the necessary holes cut out and drilled. I used small switches for ‘dummy’ leavers.
           I also managed to get hold of a small figure to do the driving!     (This is the most recent stage of the build as of 31st Jan 2012) That’s all the interior finished now, I’m just left with the outer cab which I’m in the middle of doing so I’ll get some pics posted soon. I can see the finish line! With the exception of painting it!  Thanks for looking Last edited by Jigglepin; 01-31-2012 at 04:53 PM. |
|
#13
|
||||
|
||||
|
A really cool build! Nice craftsmanship.
Joe
__________________
"Experience is what you get right after you needed it." |
|
#14
|
||||
|
||||
|
Yep this is very cool build for sure.. It is amazing what you can build out of wood it does not have to be all plastic and metal.. Nice work cant wait to see more..
__________________
Paul W. "Tamiya Cowboy" HI.. My name is Paul.. And.. I.. Have a Cabover Addiction. RIP FreddyGearDrive 2-12-59/12-19-11 "LET IT EAT" Like Us on Facebook "Corn Field Mafia" To view links or images in signatures your post count must be 10 or greater. You currently have 0 posts. |
|
#15
|
||||
|
||||
|
superb workmanship, I like wooden toys, because there is a lot of hard work and sweat gone into making them,can't wait to see more...
|
|
#16
|
||||
|
||||
|
Welcome aboard! Very creative!
Cheer's, Neil. |
|
#17
|
||||
|
||||
|
Hey Jigglepin,welcome to the forum,awesome job you have done with the loader,very creative,like your screwdrive rams,seems to work great

__________________
To view links or images in signatures your post count must be 10 or greater. You currently have 0 posts. To view links or images in signatures your post count must be 10 or greater. You currently have 0 posts. |
|
#18
|
||||
|
||||
|
Hi guys,
thanks for all the great comments, the interest is much appreciated 
__________________
To view links or images in signatures your post count must be 10 or greater. You currently have 0 posts. |
|
#19
|
||||
|
||||
|
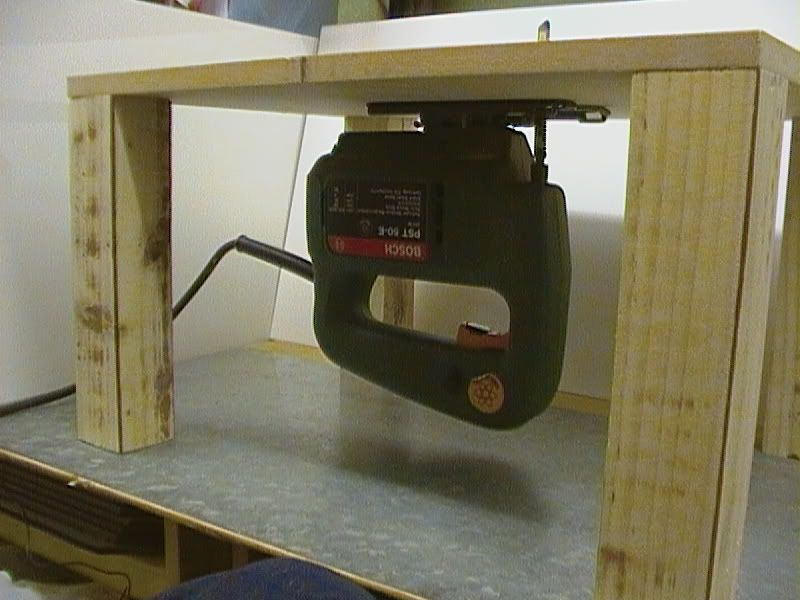
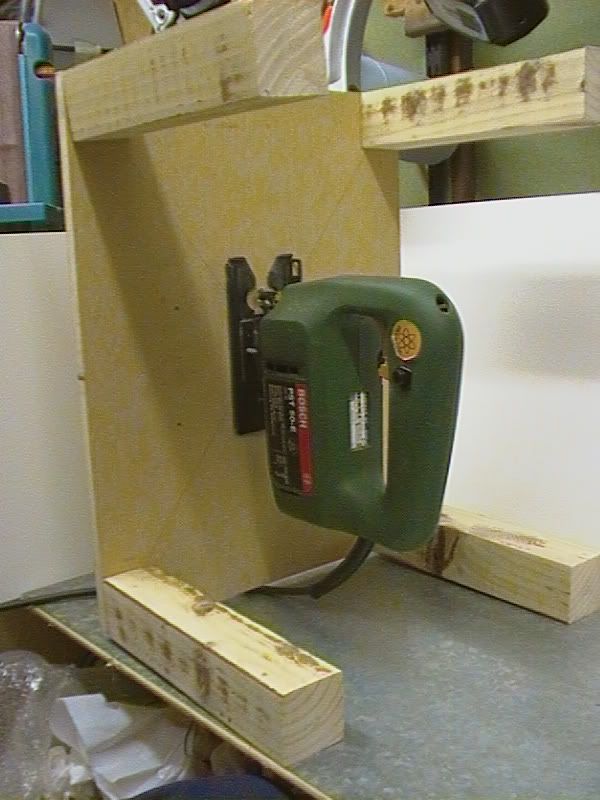
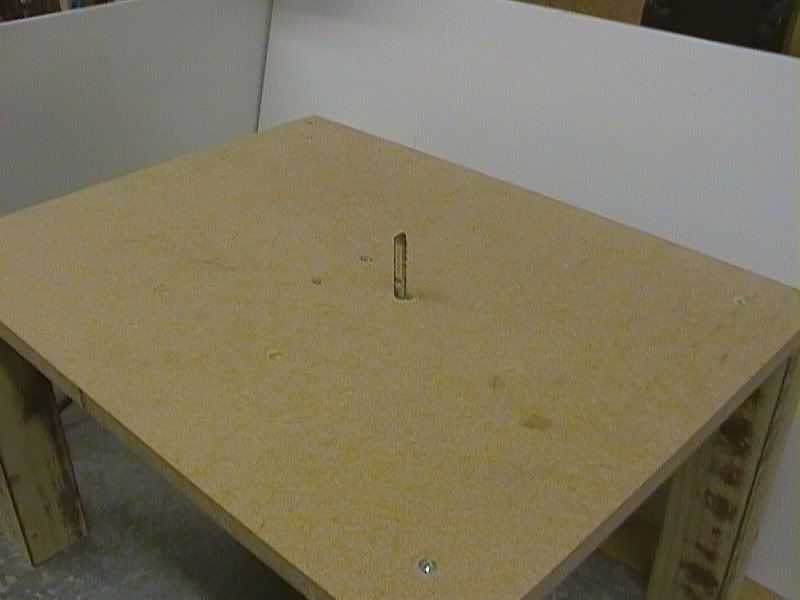
I have made progress on the cab area now, for this stage I needed to use a jigsaw to cut out the necessary holes. The pieces were to small to clamp to use the jigsaw in the ordinary fashion, trying to guide the jigsaw over such small pieces would have been a real pain!
So I made a little table allowing me to fix the jigsaw underneath, drilled a hole allowing the blade to pass through onto a flat surface. This way I would have control of the piece I was cutting, similar to using the bandsaw.   
__________________
To view links or images in signatures your post count must be 10 or greater. You currently have 0 posts. |
|
#20
|
||||
|
||||
|
For the main parts of the cab, I cut out 3 roughly square pieces of 6mm MDF, they all measure 85mm high and differ alittle in length. I measured and marked out all the necessary parts to be cut (doors/windows and front window) I drilled some holes in the corners of the windows, allowing the jigsaw blade to pass through, then carefully cut them out.
Some sanding was needed to neaten them up. I cut the door frame using the band saw, then put the template over another piece of MDF and traced round the frame to get the exact shape of the door. Marked out the window in the door and used the jigsaw to cut it out. I found some small hinges to attach the doors to the frame.      I decided to screw the main parts together using really small screws, (I’m not sure weither to glue them at a later stage) and then screwed the cab frame to the floor. I'm also thinking of giving the cab alittle shape to try and get it away from looking like a box! maybe by curving the front edges and angling the front off at the top.    Thanks for looking 
__________________
To view links or images in signatures your post count must be 10 or greater. You currently have 0 posts. Last edited by Jigglepin; 02-22-2012 at 04:17 PM. |
 |
| Currently Active Users Viewing This Thread: 1 (0 members and 1 guests) | |
|
|