|
|||||||
| Highway Trucks and Trailers On road trucks and trailers single and twin axle trucks. |
 |
|
|
Thread Tools | Display Modes |
|
#1
 05-15-2014, 10:49 AM
|
|||
|
|||
|
I started this on another forum but after finding this forum I felt like I needed to share it here too with more people. Hope you enjoy.
(04/27/14) Well I finally broke down and decided to do another Tamiya semi build. I built a Knight Hauler 7 or so years ago and loved it but due to unfortunate timing I had to sell it off. I always wanted to do another but there really wasn't a kit that grabbed my attention again. That was until I was browsing eBay on April 1st of all days and found a listing for a Tamiya Cascadia. I first thought it was a joke and immediately went to tamiyausa.com to see if it was true and as soon as the page loaded it was the first thing on the banner and it wasn't a joke. So fast forward a few weeks and much contemplation I made one big order with rcmart and then a small order from stellamodels for pretty much everything I needed for the build. I was like a kid on Christmas when the postal courier showed up with both boxes on Friday. Broke them open and check to make sure everything was there but then had to put it on the back burner until this afternoon when I started building things. Here's a few pics to start with of the contents of the boxes that arrived and a couple of the Knight Hauler I built. Last edited by mavrick0; 05-15-2014 at 11:03 AM. 
|
|
#2
05-15-2014, 10:51 AM
|
|||
|
|||
|
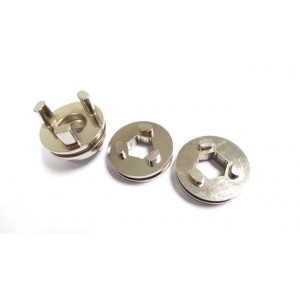
(04/27/14)
So I started the build this afternoon with the axles first since 90% of the stuff was new upgraded and only had to grab the axle shafts out of the bag in the Cascadia kit. I decided to go with the upgraded internals for the axles because they are heavy duty and also use a pin to retain the drive cup rather then the set screw. Last edited by mavrick0; 05-15-2014 at 11:03 AM.
|
|
#3
05-15-2014, 10:53 AM
|
|||
|
|||
|
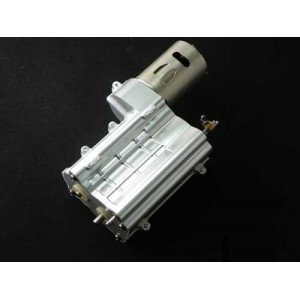
(04/27/14)
Next I tackled the tranny since again the majority of the parts were upgrades and wanted to see how well this new gear set worked. Also installed the Tamiya optional tractor motor to go with the heavy duty tranny. That's as far as I've gotten today but will start on setting up the radio and the MFU system and begin the assembly of the frame. Last edited by mavrick0; 05-15-2014 at 11:03 AM.
|
|
#4
05-15-2014, 10:56 AM
|
|||
|
|||
|
(04/29/14)
So I started out yesterday morning with unpacking and organizing the MFU to do a bench test and setup the radio and servos for install into the chassis when I got to that point. As you can see by the pics if you have a phobia of wiring or electronics this isn't for you even though Tamiya makes it really simple it's still a lot and when I begin to install it there will be a lot of test fitting to get the wires hidden and where I want them. I do like some of the new features on the this new MFU and options. I still wish somehow Tamiya would make it possible to download and install your own sound files so you can really customize the truck. Last edited by mavrick0; 05-15-2014 at 11:02 AM.
|
|
#5
05-15-2014, 11:01 AM
|
|||
|
|||
|
(04/29/14)
So once I was done "playing" with the MFU and had it all packed up it was time to get back to the build. Now comes the fun of building the frame and installing the servos. I tend to make things harder for myself by always using threaded hex hardware versus the standard self-tapping Philips hardware that Tamiya supplies, but I think the pain in the wrist is all worth it in the end. Once the chassis was done it was time to build the shocks. As much as I'm not going to use the stock shocks I figured I might as well build them and then the parts aren't laying around. The reason I bought the upgraded Tamiya oil filled shocks was for the colour. I remembered with the knight hauler they came with an ugly pink colour stock shock which just didn't look right. I was surprised with this kit they are actually a plan aluminium. But the oil filled are a nice gun metal which still looks better against the black frame. Now it was time for the front axle to be built. Rather straight forward and simple but still always fun as with any build. Finally it was time to bring the frame, tranny, front and rear axles together. I wasn't able to install both rear axles because for some reason either I wrote down the wrong part number for the screws I needed when I went and didn't my order or the counter person read it wrong or pulled the wrong part. Either way I ended up with flathead M3x20mm versus the buttonhead M3x20mm. Luckily I had 4 sitting in another screw box so I as able to get one axle under the frame. So this is the way it sits on my bench this morning. I have to run out and get the screws I need so I can continue with more of the build. Looking back to yesterday things for the most part went together pretty smooth but then again it's a Tamiya so you'd expect that. Only pita was the upgraded shocks. The lower shock mount is slightly different then the stock. You need to use 2 spacers. So while trying to put the screw through the mount you have to hold one spacer then the shock and then the other spacer. Definitely a tricky endeavour specially with some of the tight areas between the leaf spring and axle.
|
|
#6
05-15-2014, 11:04 AM
|
|||
|
|||
|
Looking good so far, I'm interested to see where you go with this..
|
|
#7
05-15-2014, 11:06 AM
|
|||
|
|||
|
(05/12/14)
I know it's been a while since I've updated this build. I haven't done a ton as I've just keep going between this build, the trailer project for this truck and my trailer truck so things keeping getting divided. I'm also waiting on some parts to continue with the build. I'd rather have the parts on hand as I build rather then have to disassemble half the truck to change something. But I did get my screws last week and was able to get a few more things done. Here's a couple pics. The nice thing is I did get a couple of packages this morning with some more parts so I'll update again a little later today.
|
|
#8
05-15-2014, 11:10 AM
|
|||
|
|||
|
(05/12/14)
So just a quick update. Here's a pic of the items that came in today. I had to get a set of more scale tires for what you'd see up here. The stock Tamiya are fine if the truck was running down in So Cal or Arizona where they don't get snow but for everywhere else that has to deal with the bad weather these are what you'd see more of. I'll be keeping the stock tires on the front of the semi as they are closer to a normal steer tire. So trying to make this look as scale as I can I had to go with a set of these drive shafts. Not overly thrilled that the short one is silver since it was black in the pics when I ordered it but we'll see what the eBay seller does to resolve the issue. But they do look great and I love the wrench that comes with the long drive shaft for tightening down the nuts. Now to start installing them and do a little more work to the frame and wiring.
|
|
#9
05-15-2014, 11:15 AM
|
|||
|
|||
|
(05/15/14)
Got a little more work done on the semi. Added the new driveshafts, installed the rear end of the frame with lights and mud flaps as well as the new rc4wd tires to see how it all looks. I'm not using the stock wheels as I have a set sitting in the US for me to pick up which will be happening in about a week plus a bunch of other stuff for the truck and the trailers. Then doing a little work to the electronics plate and setting up the MFC and planning the wiring. So this is where it sits as of today. Don't see too much more being done to it till after our long weekend up here and I get down to the US to pick up a bunch of stuff and I mean a bunch. lol.
|
|
#10
05-15-2014, 12:01 PM
|
||||
|
||||
|
Nice work so far! If you going to run the brass gears why not add the metal shift dogs?
 http://www.rigidrc.com/shop/transmis...-14-truck.html Keep up the good work.
|
|
#12
05-15-2014, 01:20 PM
|
||||
|
||||
|
Then you will need the aluminum case.
 http://www.rigidrc.com/shop/transmis...-14-truck.html And PMD 4:1 reduction. http://www.gardentrucking.com/detail...d#.U3T3LV7oZhA
|
|
#13
05-15-2014, 02:28 PM
|
||||
|
||||
|
It is great to see your Freightliner build. I just ordered my Freightliner from Tower and it should be here sometime next week. I will be following your build thread to pick up suggestions for mine and to see how you do things. I have a few things to learn on these new kits with the MFU.
I do have a question, is it necessary to have the metal gears in the transmission? I will be using a 60T brushed motor and not contemplating any heavy loads, just stock van trailer. Your build looks great so far, really like your tire choice. That drive shaft is really cool, where did you get it?
|
|
#14
05-15-2014, 02:44 PM
|
|||
|
|||
|
Claus I wish their site worked so I could see some of the stuff they have. Don't know if I will need the aluminum case. I went with Tamiya crabon reinforced rear axle and tranny housing so that should be strong enough.
rctrucker2 you don't need the brass gears but I figured if I was making such a big order might as well give them a try. I don't plan on anything really heavy but you never know what the future might have. When I did the knight hauler it was all stock with the box trailer and stock motor and never had an issue with it and I know to this day it's still running without issue with the guy who owns it now. The drive shafts I found on eBay. Here's the links for you: http://www.ebay.com/itm/1-14-rc-Truc...item2a3cad153f http://www.ebay.com/itm/291136408718...84.m1439.l2649 On a side not got a pair of Rcmier fifth wheels in. Love the fact that the screws are hidden, makes it look a lot better. Last edited by mavrick0; 05-15-2014 at 02:48 PM.
|
|
#15
05-15-2014, 03:22 PM
|
|||
|
|||
|
mavriok0;
I see your Cascadil transmission has helical cut gears. Are they quiter than the spur (straight cut) gears Tamiya uses in their other trucks? Spur gears always make a lot of noise. If helical cut gears are cut at 45 degrees they can used for a 90 degree drives. Ken
|
|
#16
05-15-2014, 03:28 PM
|
|||
|
|||
|
Ken I'm not sure if they are any quieter then the stock. Won't know till have I have something to compare it with. I'd say that the quietness that might come with the helical cut might be negated by the fact they are metal and the noise that will occur from that. I'm sure it would be quieter then if they were standard cut gears in metal.
|
|
#17
05-15-2014, 04:46 PM
|
||||
|
||||
|
Mavrick0;
Thank you for the information, glad to know stock setup will work fine. I overspent my budget on all the stuff I ordered already. That driveline sure looks good for a future upgrade. You are going to have a very fine truck when you finish.
|
|
#18
05-17-2014, 02:12 AM
|
||||
|
||||
|
Very cool build! You are certainly going all out with this!
Yeah those metal gears are louder, still nice though. The MFC-03 is a fantastic unit, it is a million times smoother than the 01 in terms of drivability. It can be loud under throttle but it isn't as bold as the MFC-01. Looking forward to seeing where you go with this 
__________________
4 tractors/trailers and still no king hauler...
|
|
#19
05-17-2014, 09:03 PM
|
||||
|
||||
|
I will agree with you on the socket head cap screws. They are so much nicer than Phillips head screws. Here's a little tip for you. To ease the pain of threading the screws into the plastic parts, get yourself the corresponding tap to match the screws you use. For Tamiya rigs, it's mostly 3x.5mm threads. Anyway, run the tap through all the plastic parts before you assemble them. The tap will cut the threads, which means the screws will run right into the holes like butter. If you are worried about them fitting loose, don't be, but if you want to be sure they don't back out, tap about 3/4 the depth of the screws you use for each hole. That way the screw will cut it's own threads the last couple millimeters and that will keep them tight. You could cheat and use a cordless drill to speed up the tapping process too, but be careful not to go to crazy with the speed. Clean the plastic out of the tap flutes after every hole.
__________________
Nathan
|
|
#20
05-17-2014, 09:17 PM
|
||||
|
||||
|
Mavrick0
I have a question on the screws you are using. They appear to be some type of hex head screw. What are they? What sizes did you use and what thread are they? How do I get some? I think that the hex head looks a lot better than the Phillips that comes in the kit and would like to use them on my build. Your attention to detail on this build is outstanding. Thank you for sharing your build with us.
|
|
| Currently Active Users Viewing This Thread: 1 (0 members and 1 guests) | |
|
|


 Linear Mode

